Intruder Alarm System using Maker Feather AIoT S3, GCP and MongoDB Atlas
Enhance your security using Cloud Service and MongoDB Atlas


Do you wonder how to make your own intruder alarm system using IoT and Cloud Services? Then you are in the right place.
This blog is about how i make intruder alarm system using Maker Feather AIoT S3, Google Cloud Platform and MongoDB Atlas.
This intruder alarm system will trigger the buzzer and LED whenever the PIR motion sensor detected motion or the door sensor detect the door opens. On top of that, it will send the sensor data to GCP via MQTT and store the data into MongoDB Atlas Cloud Database. We can visualize the detection result in MongoDB Atlas using dashboard.
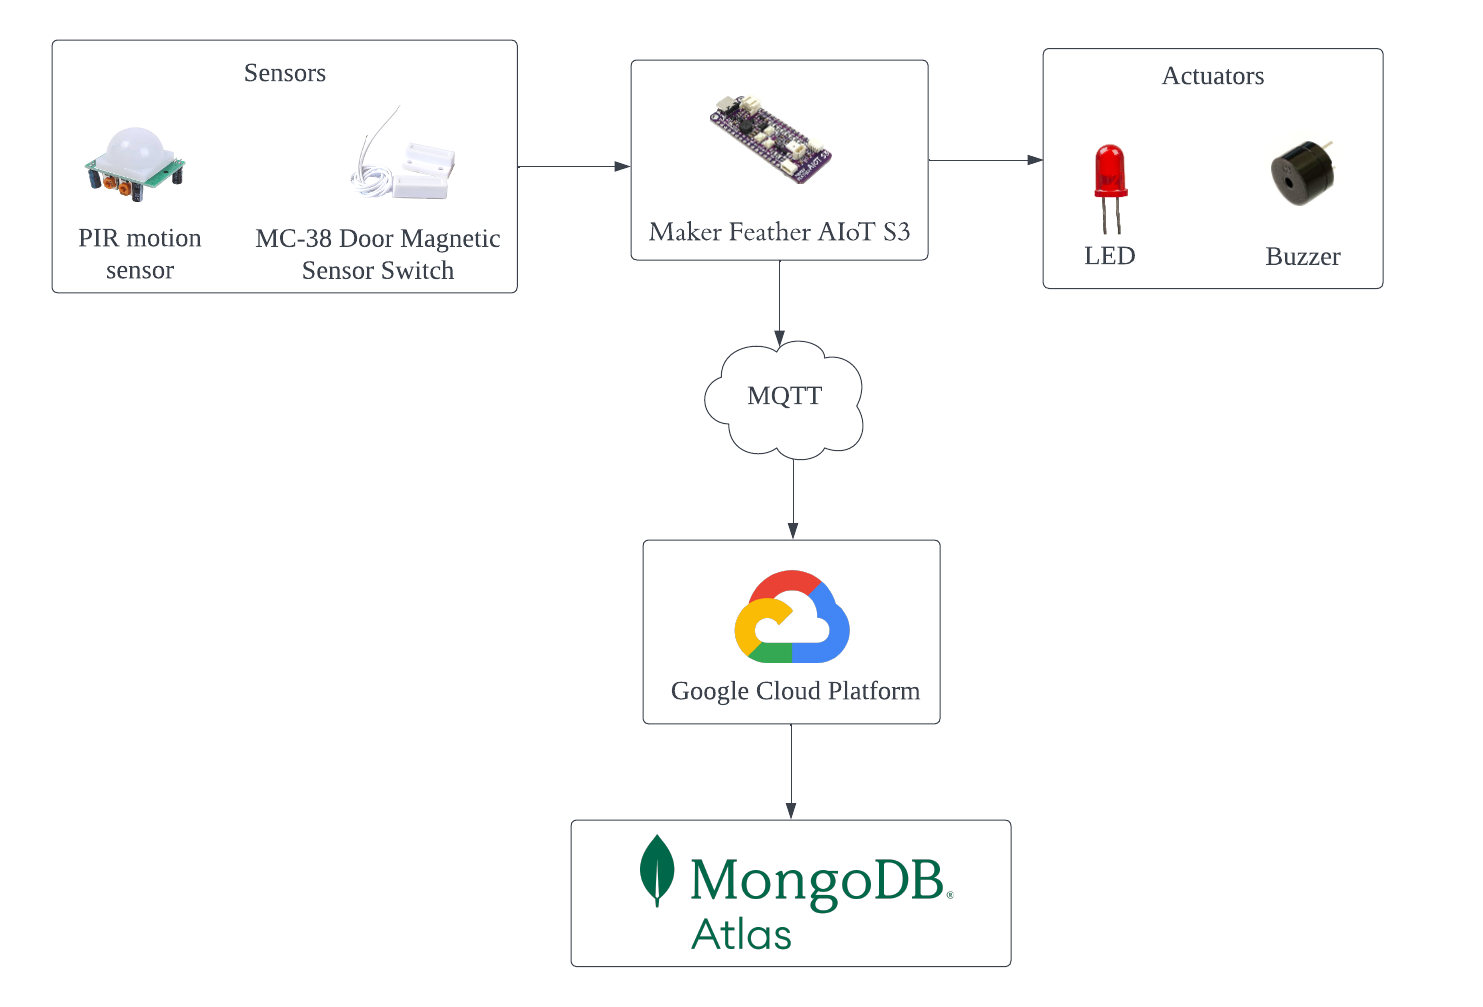
Architecture Diagram
Technology Deployed
Maker Feather AIoT S3 board
Buzzer
LED
PIR Motion Sensor
MC-38 Door Magnetic Sensor Switch
Arduino Code
Google Cloud Platform
MongoDB Atlas
Description
The intruder alarm system utilizes a passive infrared (PIR) motion sensor and MC-38 door magnetic sensor switch that are interfaced with the Maker Feather AIoT S3 board to detect intrusions.
When the PIR sensor senses movement or the door sensor detects an opening, it sends the data to the Maker Feather AIoT S3 board. The board will then activate the buzzer, which sounds an alarm and blinks the LED as a visual alert signal.
To communicate with the cloud, the Maker Feather AIoT S3 uses the MQTT protocol to publish the intrusion event data to the Google Cloud Platform. Google Cloud enables the collection of intrusion event data and stores it in a MongoDB NoSQL cloud database for long-term storage. Then, MongoDB Atlas will access the intrusion events data from the MongoDB cloud database to visualise the stored intrusion events data using the Atlas dashboard.
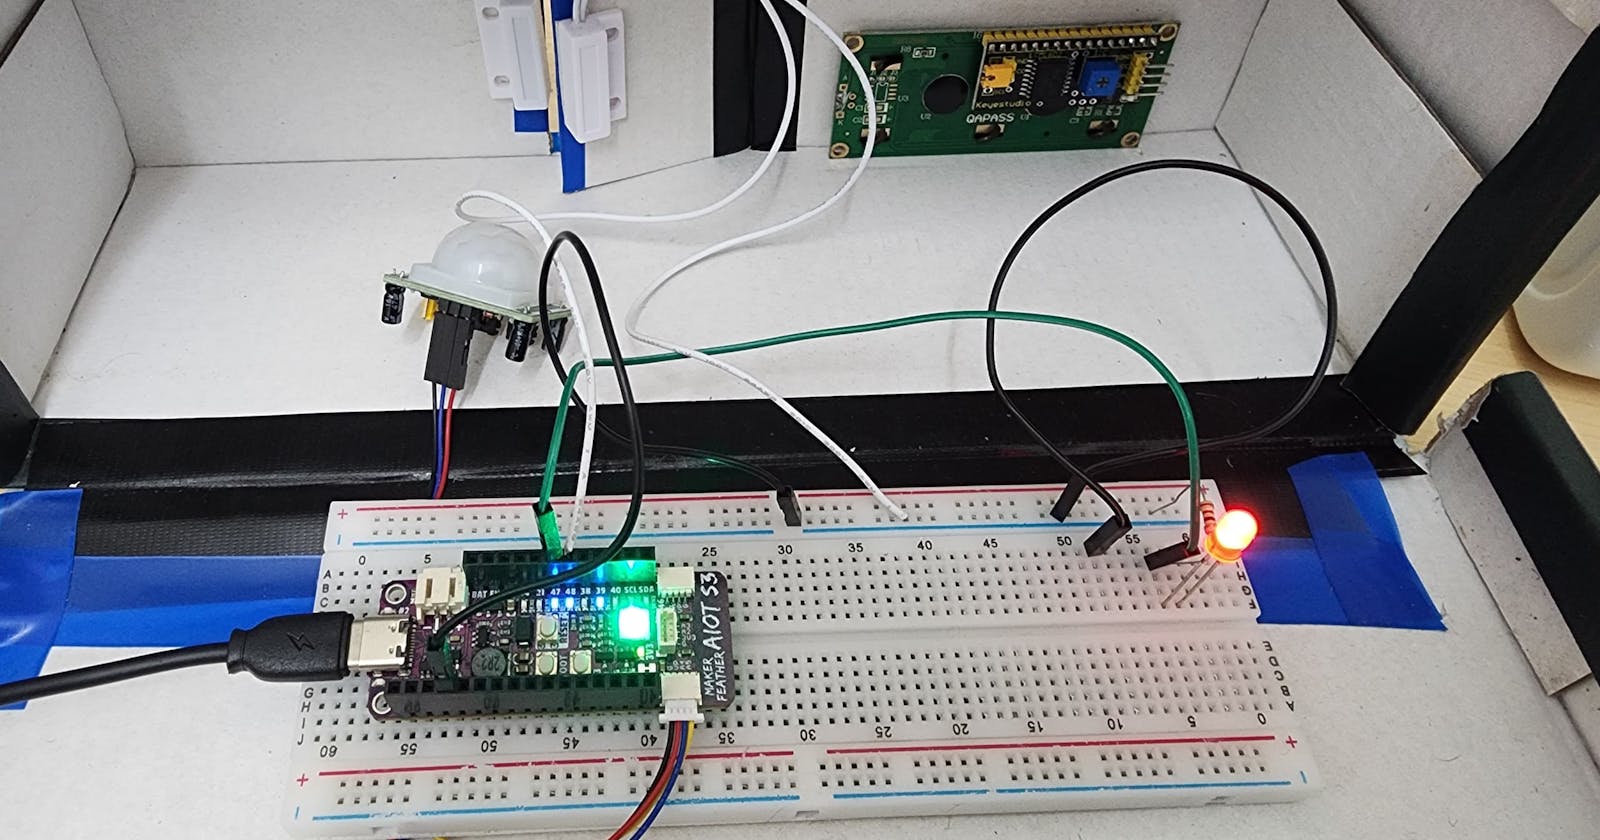
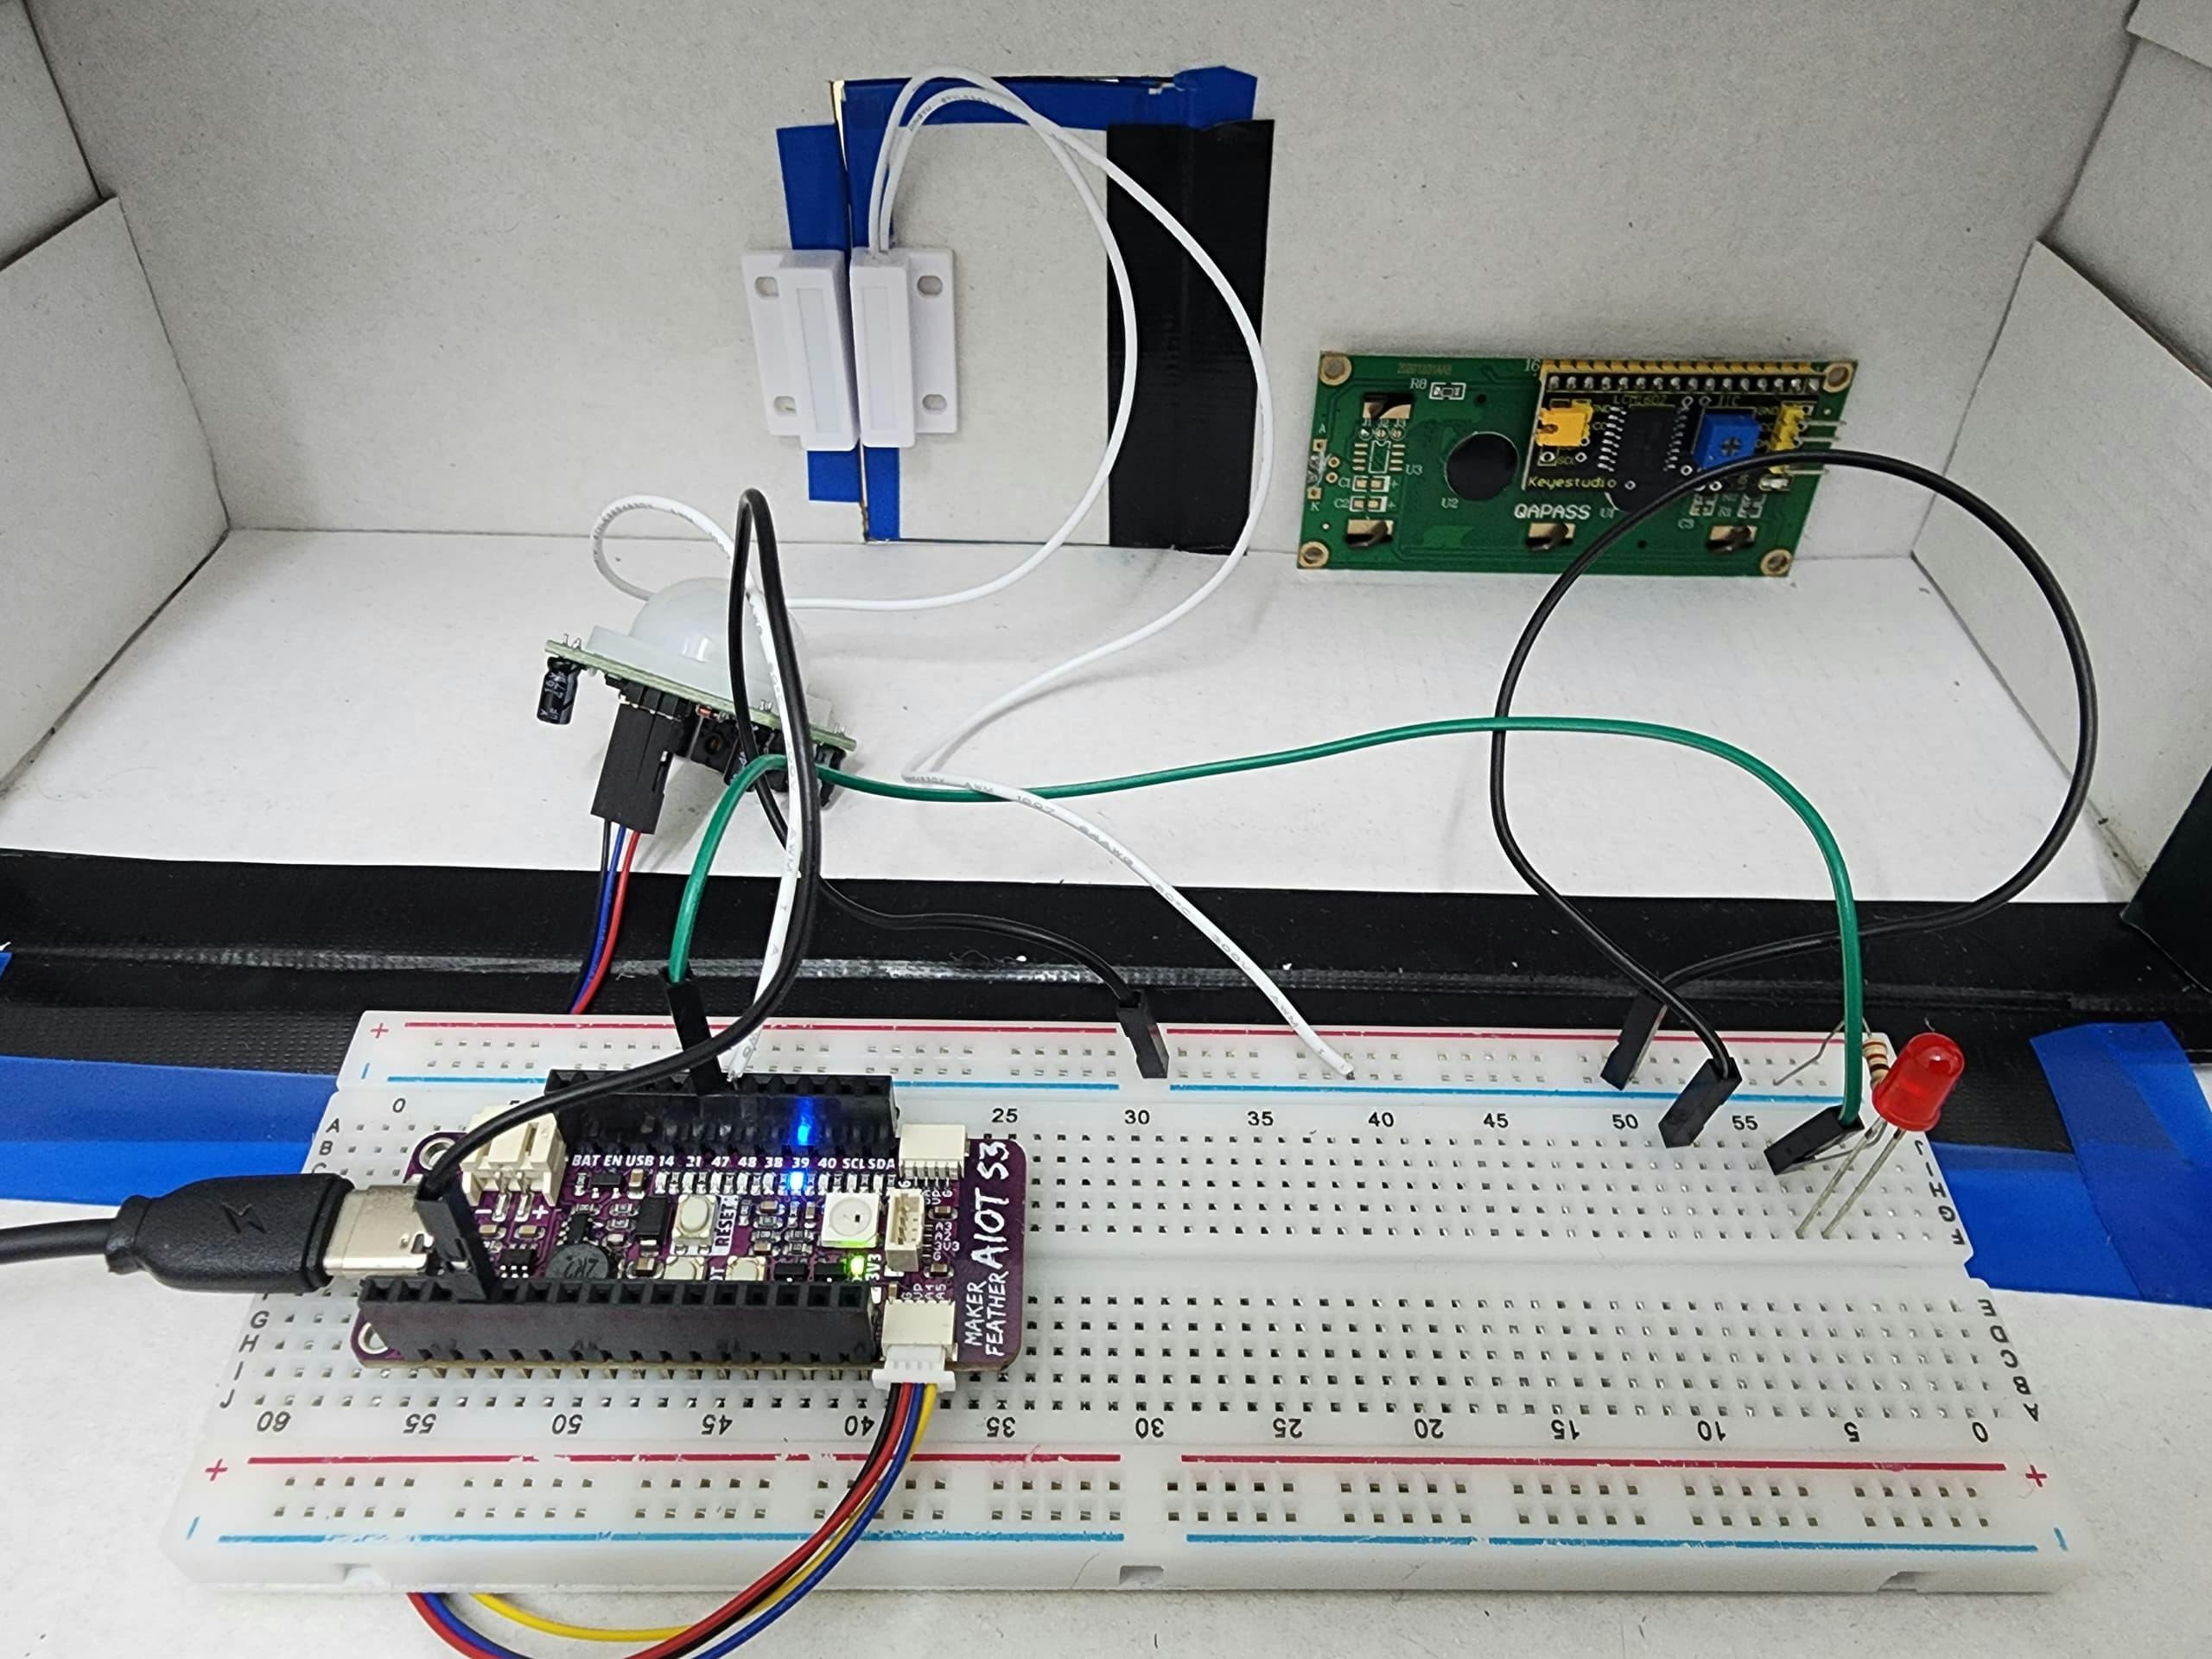
Hardware Setup
Setup the Hardware as shown in the image below.
Software Setup
Google Cloud VM Setup
- Create a Google Cloud VM

- SSH into the VM and run the code below to install MQTT.
sudo apt-get update
sudo apt-get upgrade
sudo apt-get install mosquitto
sudo apt-get install mosquito-clients
Create a firewall rule to allow traffic on port 1883.
Add the firewall rule to the VM instance's configuration.
- Edit the default-allow-internal rule to allow ingress traffic on TCP port 1883.
Arduino Code Setup
Download the intruder_detection.ino and put into your Arduino IDE and change the Pin, MQTT Server, Wifi setup accordingly.
intruder_detection.ino
/*
INTRUDER ALARM SYSTEM using Google Cloud Platform and MongoDB Atlas
*/
#include <WiFi.h>
#include <PubSubClient.h>
#include <Adafruit_NeoPixel.h>
#define NUMPIXELS 1
#define DELAYVAL 500
#define INTERVAL 500

//Pins, change the pins according to your setup
const int buzzer = 12;         //at Pin 12
const int ledPin = 47;         //at Pin 48
const int doorSensor = 48;        //at Pin 47
const int motionSensor = 4;    //Left side Maker Port
const int neoPin = 46;         //onboard Neopixel
bool ledflag = 0;

//WIFI, change the SSID and password according to your setup
const char *WIFI_SSID = "<wifi SSID>";
const char *WIFI_PASSWORD = "<wifi password>";

//MQTT, change the MQTT server IP according to your GCP VM setup
const char *MQTT_SERVER = "<external_IP from GCP VM>"; //external IP from GCP VM
const int MQTT_PORT = 1883;
const char *MQTT_TOPIC = "intruder";
// Timer: Auxiliary variables
unsigned long now = millis();
unsigned long lastTrigger = 0;
boolean PIRvalue = false;
Adafruit_NeoPixel pixels(NUMPIXELS, neoPin, NEO_GRB + NEO_KHZ800);

// Checks if motion was detected, sets LED HIGH and starts a timer
void IRAM_ATTR detectsMovement() {
  PIRvalue = true;
  lastTrigger = millis();
}

//last message time
unsigned long lastMsgTime = 0;

//setup Wifi Client
WiFiClient espClient;
PubSubClient client(espClient);

void setup_wifi() {

  delay(10);
  // We start by connecting to a WiFi network
  Serial.println();
  Serial.print("Connecting to ");
  Serial.println(WIFI_SSID);

  WiFi.mode(WIFI_STA);
  WiFi.begin(WIFI_SSID, WIFI_PASSWORD);

  while (WiFi.status() != WL_CONNECTED) {
    delay(500);
    Serial.print(".");
  }

  Serial.println("");
  Serial.println("WiFi connected");
  Serial.println("IP address: ");
  Serial.println(WiFi.localIP());
}

void setup() {

  //sensor
  pinMode(ledPin, OUTPUT);
  pinMode(buzzer, OUTPUT);
  pinMode(doorSensor,INPUT_PULLUP);
  pinMode(motionSensor, INPUT);
  digitalWrite(ledPin, LOW);
  // Connect to WiFi
  setup_wifi();
  // Connect to MQTT server
  client.setServer(MQTT_SERVER, MQTT_PORT);

  // Set motionSensor pin as interrupt, assign interrupt function and set RISING mode
  attachInterrupt(digitalPinToInterrupt(motionSensor), detectsMovement, RISING);
}

void mqttreconnect()
{
  while (!client.connected()) {
    Serial.println("Attempting MQTT connection...");
    if (client.connect("ESP32Client")) {
      Serial.println("Connected to MQTT server");
    } else {
      Serial.print("Failed, rc=");
      Serial.print(client.state());
      Serial.println(" Retrying in 5 seconds...");
      delay(5000);
    }
  }
}

void loop() {
  // Validation to make sure WiFi connection.
  if (!client.connected()) {
    mqttreconnect();
  }
  client.loop();

  unsigned long cur = millis();
  if (cur - lastMsgTime > INTERVAL) {
    lastMsgTime = cur;

    //Publish telemetry data
    int PIRvalue = digitalRead(motionSensor);
    int DoorValue = digitalRead(doorSensor);
    int ledValue = digitalRead(ledPin);

    if (ledValue == HIGH) {

      for (int i = 0; i < NUMPIXELS; i++) {  // For each pixel...
        pixels.setPixelColor(i, pixels.Color(0, 100, 0));
        pixels.show();  // Send the updated pixel colors to the hardware.
        delay(DELAYVAL);
        pixels.setPixelColor(i, pixels.Color(100, 0, 0));
        pixels.show();  // Send the updated pixel colors to the hardware.
        delay(DELAYVAL);
        pixels.setPixelColor(i, pixels.Color(0, 0, 100));
        pixels.show();    // Send the updated pixel colors to the hardware.
        delay(DELAYVAL);  // Pause before next pass through loop
        pixels.setPixelColor(i, pixels.Color(0, 0, 0));
        pixels.show();    // Send the updated pixel colors to the hardware.
        delay(DELAYVAL);  // Pause before next pass through loop
      }
    } else {
      pixels.clear();  // Set all pixel colors to 'off'
    }

    if (DoorValue == HIGH || PIRvalue == HIGH) {
      digitalWrite(ledPin, HIGH);
      Serial.println("Door is Opened");
      tone(buzzer, 300);
      delay(DELAYVAL);
      noTone(buzzer);
      // Format data into JSON format to store in database later
      char payload[100];
      sprintf(payload, "{\"PIR_Reading\":%d, \"DoorSensor_Reading\":%d}", PIRvalue, DoorValue);
      client.publish(MQTT_TOPIC, payload);
      // Print out the payload
      Serial.println(payload);
      // Some buffer time before performing detection again
      delay(500);
    }
    else
    {
      digitalWrite(ledPin, LOW);
    }
    delay(DELAYVAL);
  }
}
Run the code as shown as below. Make sure your device is connected to your computer to upload the code.
MongoDB Atlas
In order to persist the sensor data sent from the device, we need to store it into MongoDB Atlas database instead of localhost.
Create a MongoDB Atlas Account
- make sure you use the same email as your GCP account.
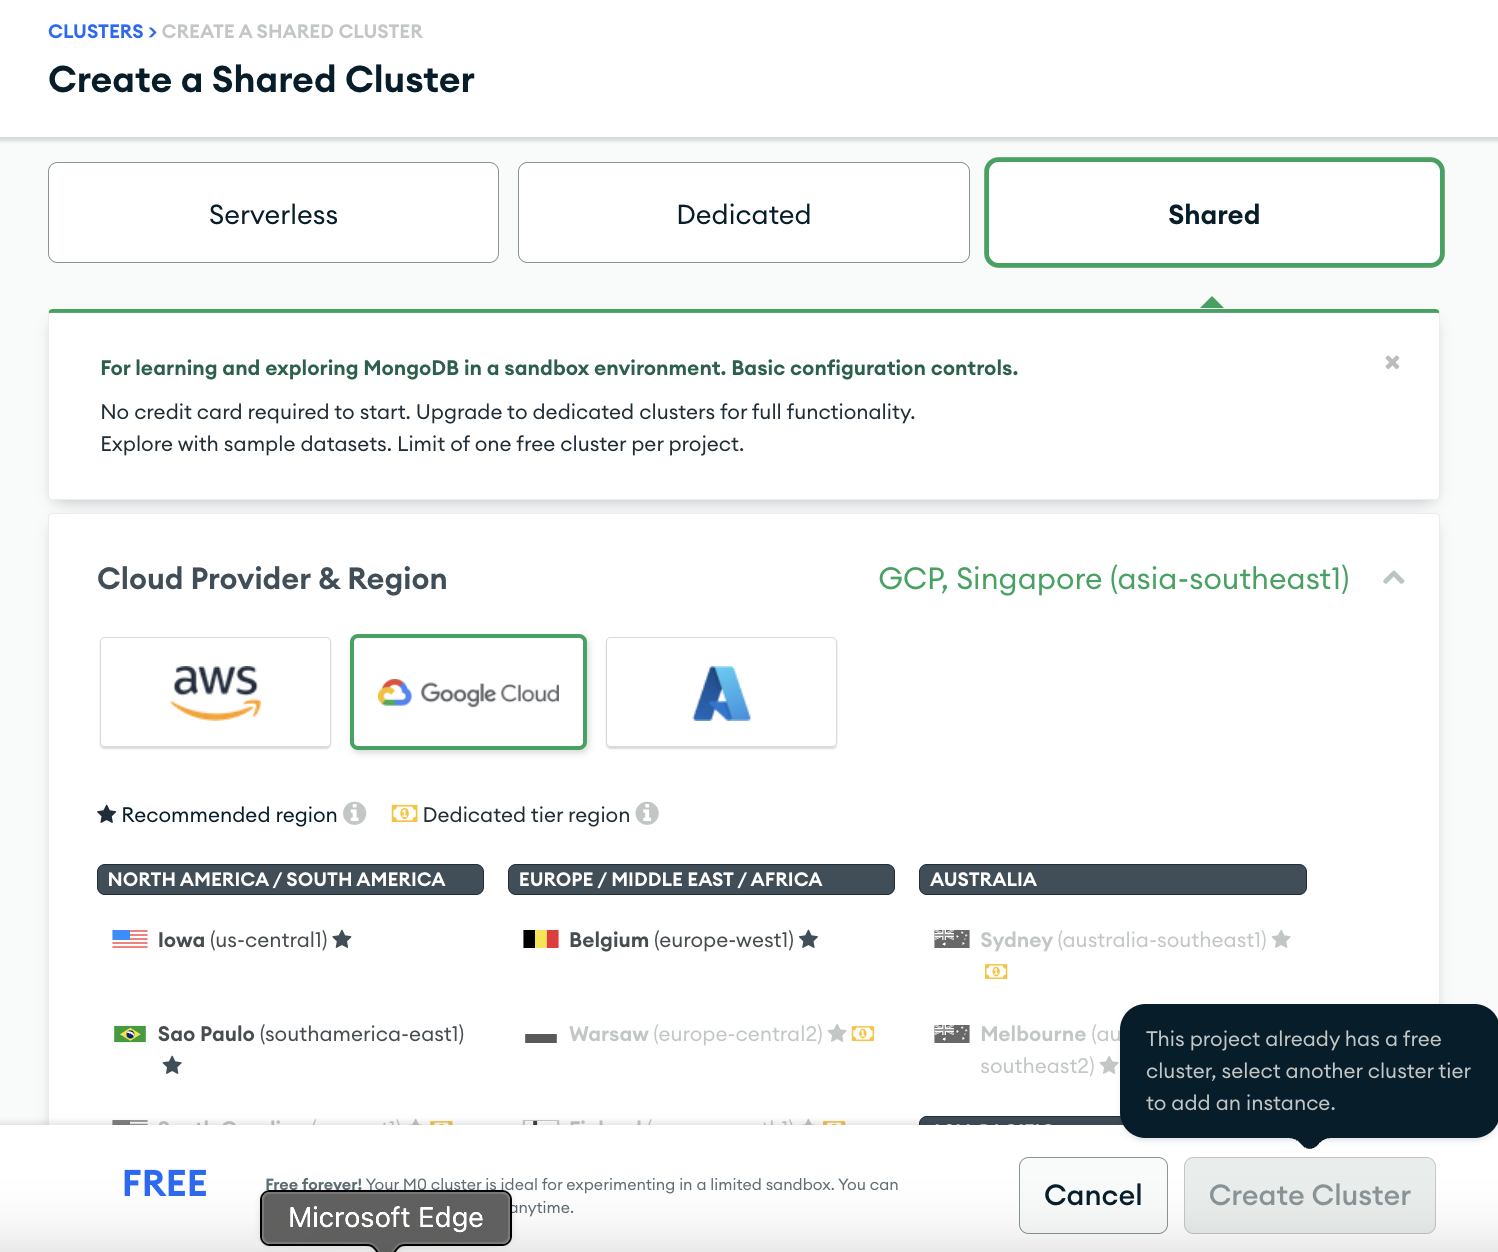
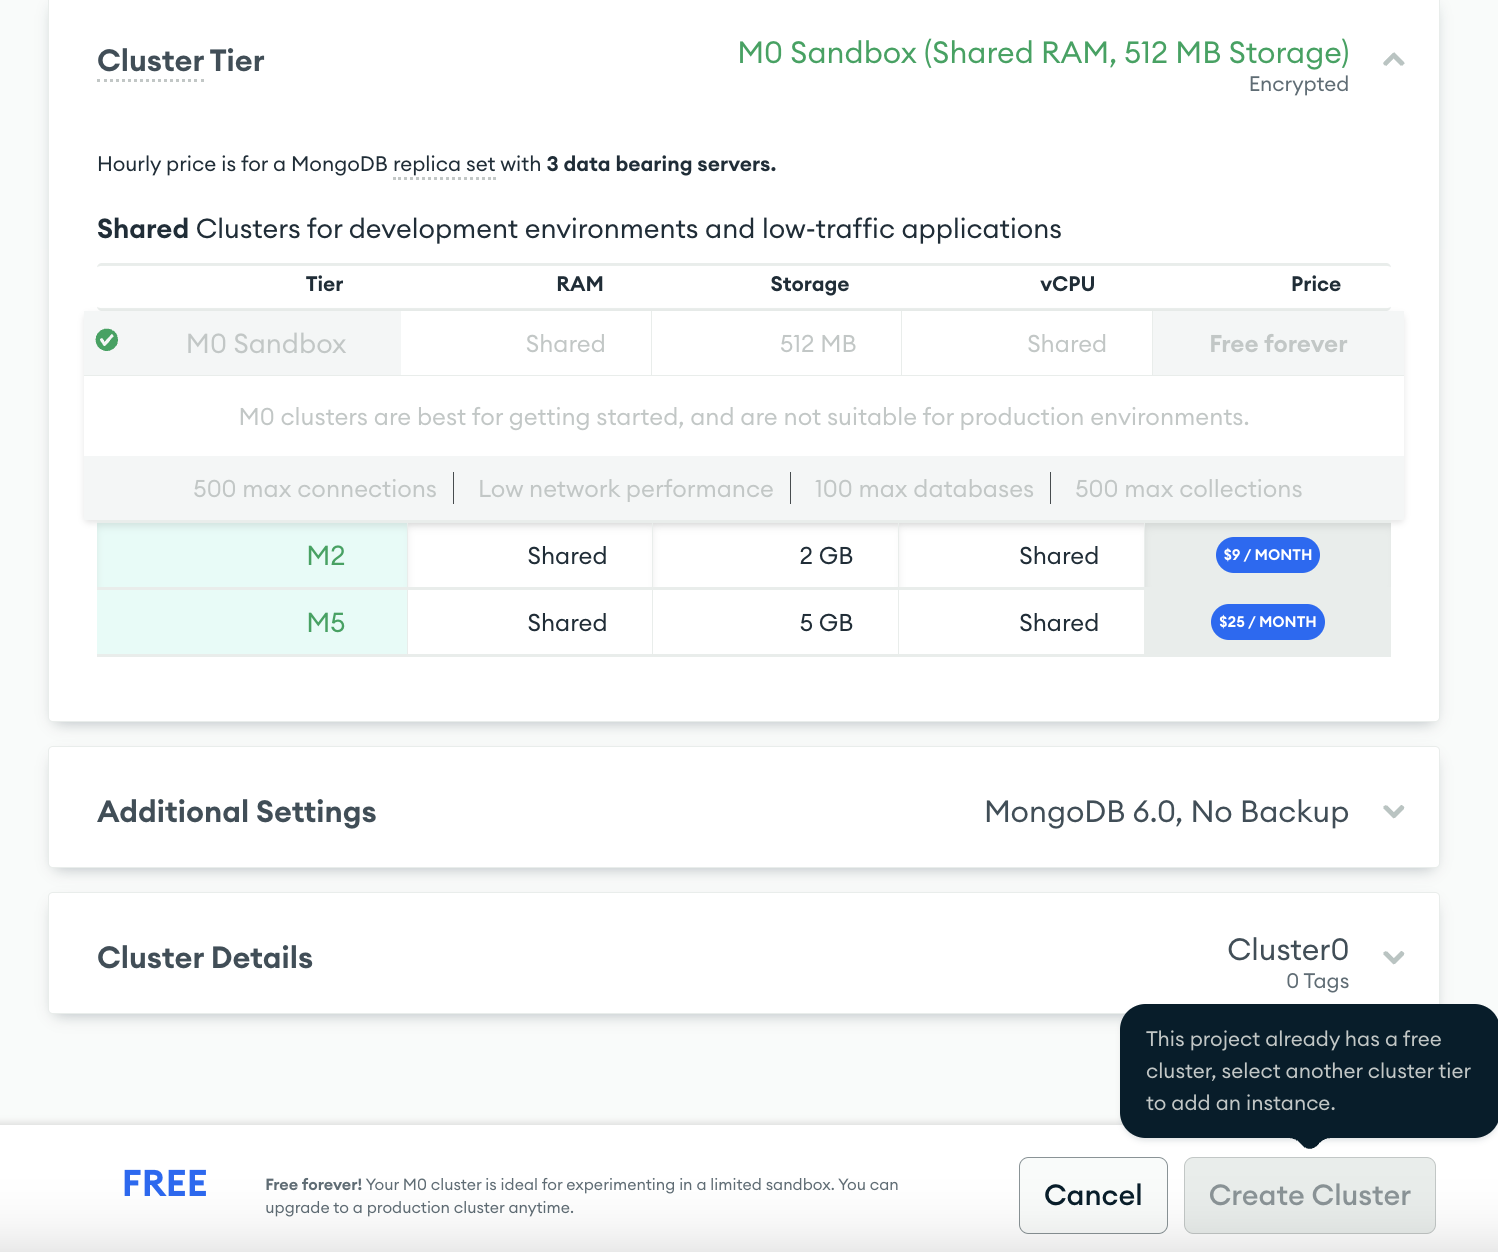
Create a MongoDB Atlas Cluster as shown as below.
- After the cluster is created succesfully, get the connection string by clicking the connect button on the home page as shown below. Make sure you change the connection string
<password>to your own password.
uri = "mongodb+srv:/shaunliew:<password>@intruder-detection.nvz8nim.mongodb.net/?retryWrites=true&w=majority"
Data Ingestion Python script
- go to the
gcp_ingest_data_mongo.pyand change the mongoDB Atlasurl connection stringandmqtt_broker_addressaccordingly.
gcp_ingest_data_mongo.py
import json
import paho.mqtt.client as mqtt
from datetime import datetime
import pytz
from pymongo.mongo_client import MongoClient
from pymongo.server_api import ServerApi

# MongoDB Atlas configuration
# change the<username> and <password> to your own username and password
uri = "mongodb+srv://<username>:<password>@intruder-detection.nvz8nim.mongodb.net/?retryWrites=true&w=majority"

# Create a new client and connect to the server
mongo_client = MongoClient(uri, server_api=ServerApi('1'))

# Send a ping to confirm a successful connection
try:
    mongo_client.admin.command('ping')
    print("Pinged your deployment. You successfully connected to MongoDB!")
except Exception as e:
    print(e)

# MongoDB configuration
db = mongo_client["intruder"]
collection = db["sensor_readings"]

# MQTT configuration
mqtt_broker_address = '35.225.95.54'
mqtt_topic = 'intruder'

def data_preprocess(message):
 return json.loads(message)

def on_message(client, userdata, message):
 payload = message.payload.decode('utf-8')
 print(f'Received message: {payload}')
 # Convert MQTT timestamp to datetime
 timestamp = datetime.utcnow()
 # Convert to Malaysia time
 malaysia_tz = pytz.timezone('Asia/Kuala_Lumpur')
 timestamp_malaysia = timestamp.replace(tzinfo=pytz.UTC).astimezone(malaysia_tz)

 # Format the datetime object
 datetime_obj = timestamp_malaysia.strftime("%d-%m-%Y %H:%M:%S")
 # Process the payload and insert into MongoDB with proper timestamp
 document = {
  'timestamp': datetime_obj,
  'data': data_preprocess(payload)
 }
 collection.insert_one(document)
 print(f"Inserted document {document}")
 print('Data ingested into MongoDB')

client = mqtt.Client()
client.on_message = on_message

# Connect to MQTT broker
client.connect(mqtt_broker_address, 1883, 60)

# Subscribe to MQTT topic
client.subscribe(mqtt_topic)

# Start the MQTT loop
client.loop_forever()
- SSH to the virtual machine created in GCP and copy the
gcp_ingest_data_mongo.pyand paste it into the VM using nano command. After you nano into the python file, copy paste the script pressctrl+Xto save it.
nano gcp_ingest_data_mongo.py
- Install the python libraries needed in your VM using the command below.
sudo apt install python3-pip
pip install paho-mqtt
sudo apt-get install -y mongodb
pip install pymongo
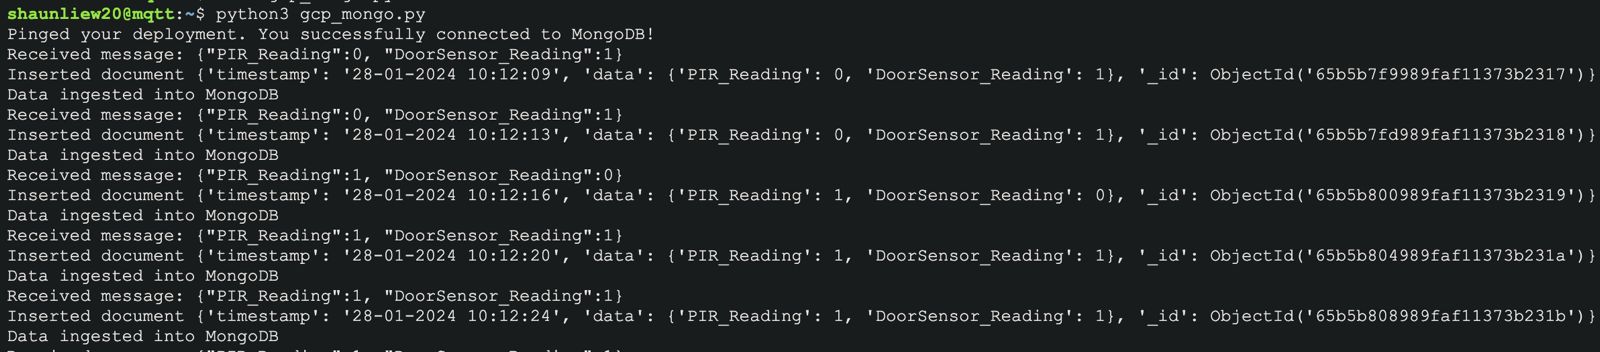
- Run the data ingestion python script.
python3 gcp_ingest_data_mongo.py
- Play around with your sensor so that it can send the data to the MongoDB as shown below.
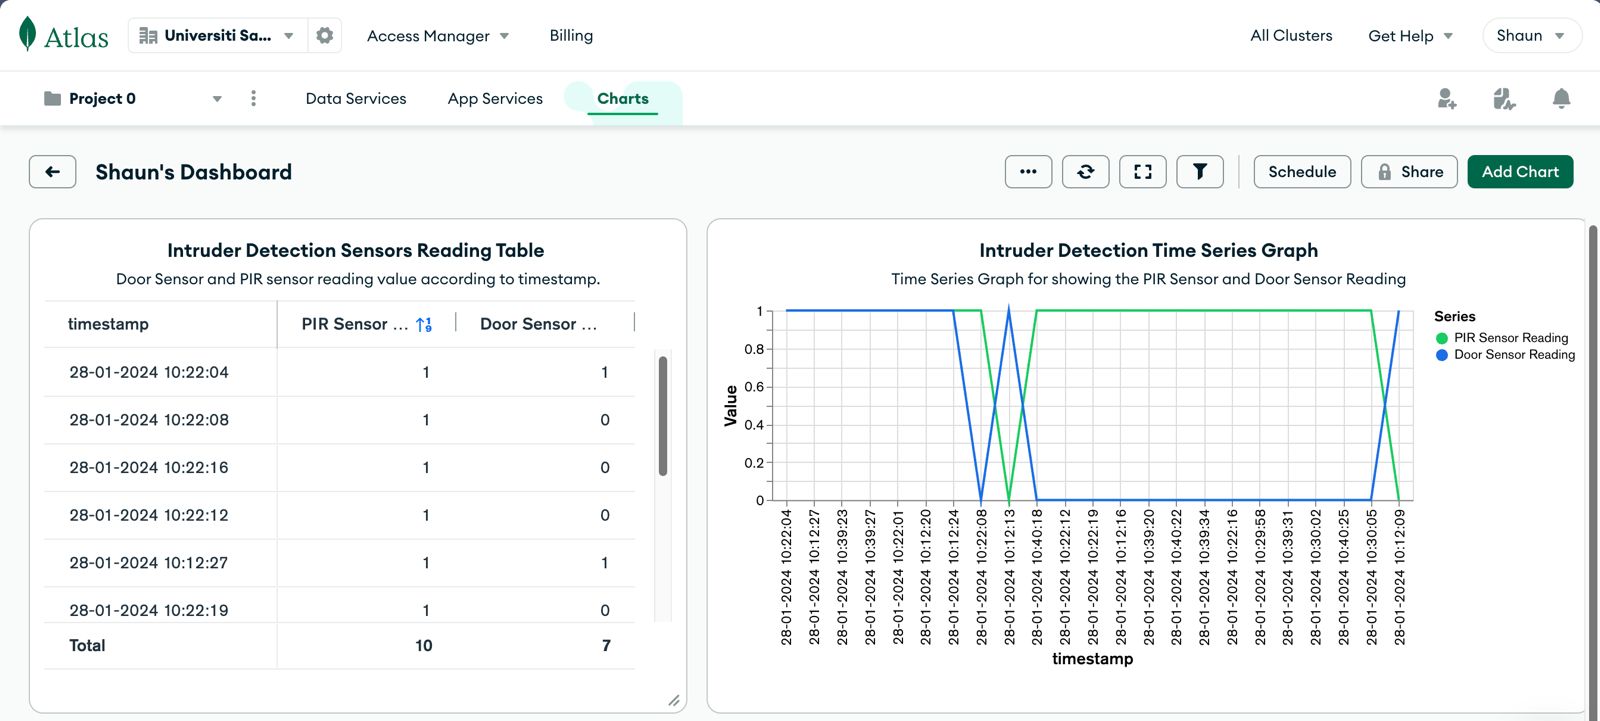
Visualize the detection result using MongoDB Atlas
Now you have successfully ingest the sensor data into MongoDB. You can check your detection result in your MongoDB Atlas Charts Dashboard. You can create different pattern of graph according to your preferences.
Final Result
You may view the final result from the youtube link below.
Intruder Alarm System Demo Youtube Video
Resources
Intruder Alarm System Demo Youtube Video
https://github.com/shaunliew/intruder-alarm-system/tree/main
Feel free to put your comment if you have any questions/suggestions!
Thank you for reading.